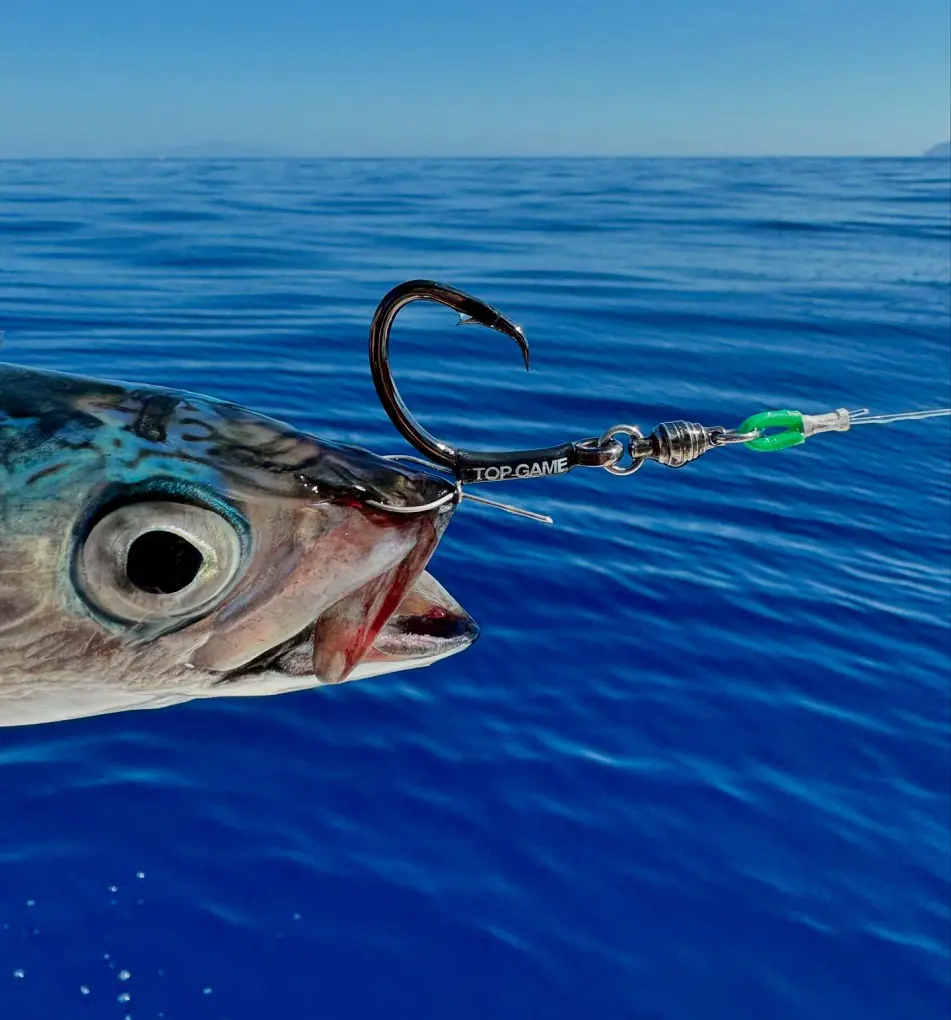
Before beginning a fishing trip, you should know a few things, regardless of your level of experience. To be really successful, you must know how to tie a fishing hook, even though you will also need to know how to handle a fishing rod correctly, cast a line, and reel in your catch.
To catch fish, you need to know how to set a hook. It's crucial to understand the basic procedures and when to put it up as various fish demand different approaches. Planting a hook into a biting fish is known as setting a hook.
Setting a Hook
A good rule of thumb when learning how to fish is to wait and feel the fish's weight before setting it. It's advisable to wait if the fish is wary and only barely taps your fishing line and bait without biting. Once you feel the fish's weight, set the hook after letting it accept the bait.
Use the right fishing hook setup for optimal results. For instance, since circular baits typically immediately get trapped in the fish's mouth, using them to catch catfish frequently removes the need to set the hook.
Here are some easy methods to set a hook:
- Look for clear signals that a fish is biting, such as your bobber being pushed totally submerged, a real tug on your fishing line, or your fishing line beginning to move, to assist you in better understanding how to set the hook.
- After that, keep your line firm and tight with the bait or lure and reel in the slack. You can feel the fish bite and set the hook more effectively as a result of this increased sensitivity.
- Setting the hook is a rather easy task. However, it can occasionally be challenging to determine whether you have a bite, are simply feeling the current, or are a fish slamming into the bait.
Few Ways to Securely Tie Your Fishing Hook
1. The Knotless Knot
Snelling a hook through the knotless knot is one of the best options if you are looking for a simple yet quick solution.
Step 1: After cutting the line to the desired length, loop the end.
Step 2: Secure the loop, which will be used for the bait.
Step 4: As you move near the end of the hook and leader line, hold the shank and wrap the line around six to eight times.
Step 5: Then, insert the other end of your line from back to front through the hook's eye.
Step 6: Finally, it's time to tighten your knot in the last step. To finish the knot, moisten it, grasp the hook and the looped portion of the line securely, and draw the other end.
2. The Improved Clinch Knot
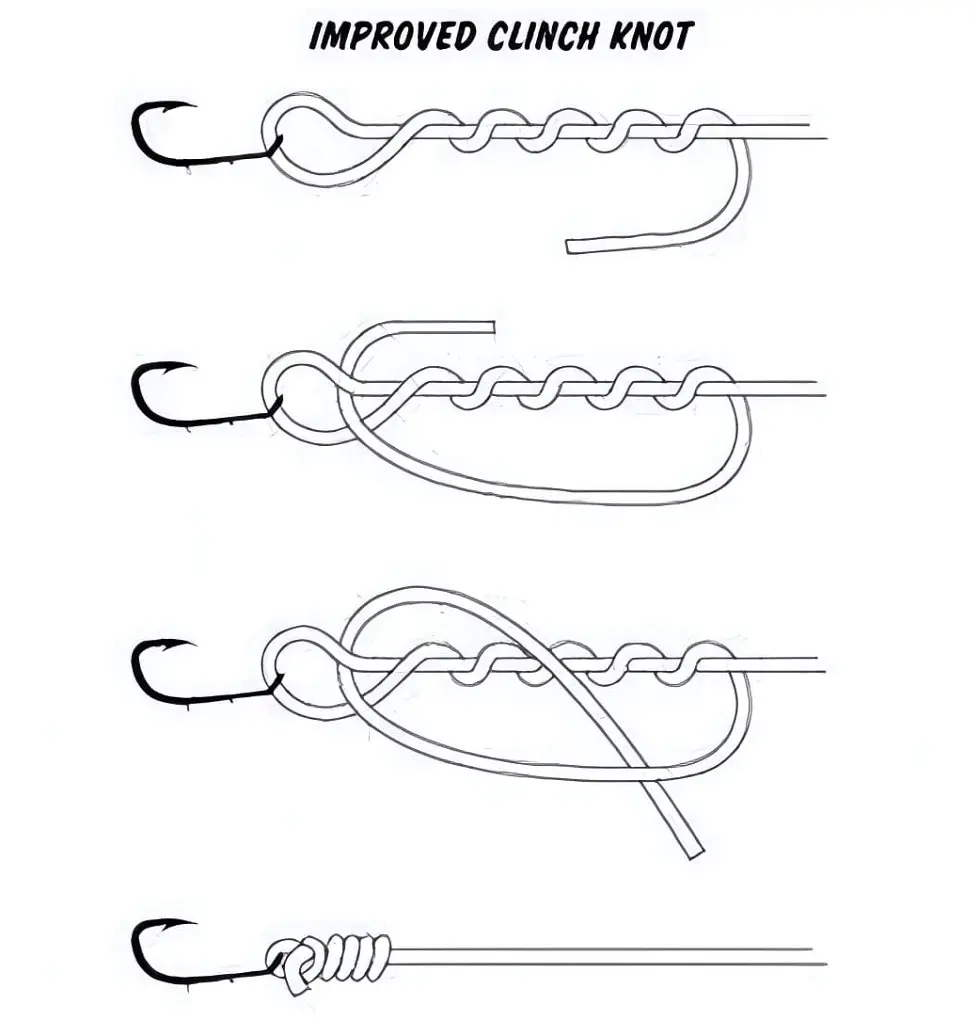
Another well-liked and incredibly reliable knot is the Improved Clinch Knot. Many large native Ormond Beach species, such as gator trout and bull redfish, can withstand its power.
Step 1: Wrap the working end of your line around the body of the line (not the hook) five to seven times after passing it through the eye.
Step 2: Bring the end back through the loose area after inserting it through the first loop adjacent to the eye.
Step 3: To tighten and trim any excess line from the working end, pull both ends.
3. The Palomar Knot
The Palomar Knot should only be used to attach the fishing hook itself but other knots can be used to tie sinkers or lures. This one works very well with braided lines.
Step 1: To begin, fold your fishing line over to create a loop. Pass the loop through the eye of the hook.
Step 2: Use slack to tie an overhand knot.
Step 3: Wrap the loop section around the fish hook's end.
Step 4: To secure the knot, pull and tighten the line.
4. The Dropper Loop
The Dropper Loop is always a good option, even if it is mostly used for bait fishing or jigging (a sinker/hook combo). This one requires caution because if you make too many loops in the line, it might become twisted.
Step 1: Holding one end of the tag, create a loop and wrap it around the fishing line at least six times (leave the area where you are twisting open).
Step 2: Insert the original loop through the central aperture.
Step 3: Tighten the turns into coils by pulling both ends firmly in opposing directions (the line and the loop will be perpendicular).
5. The Hangman’s Knot
You should know how to tie this one if you're just starting off. One of the most basic knots, the hangman Knot (also known as the uni knot), has several uses. When scheduling a charter fishing excursion, you might wish to use it.
Step 1: Bring the line side by side to the standing line after pushing the tag end through the eye. Over the doubled line, lay the tag end to form a loop.
Step 2: Pass the line beneath the loop and rotate the working end around the doubled line about eight times.
Step 3: Pull the end till it is extremely tight after wetting the lines. (You may slide it down to the eye or leave the little loop in place.)
6. The Stopper Knot
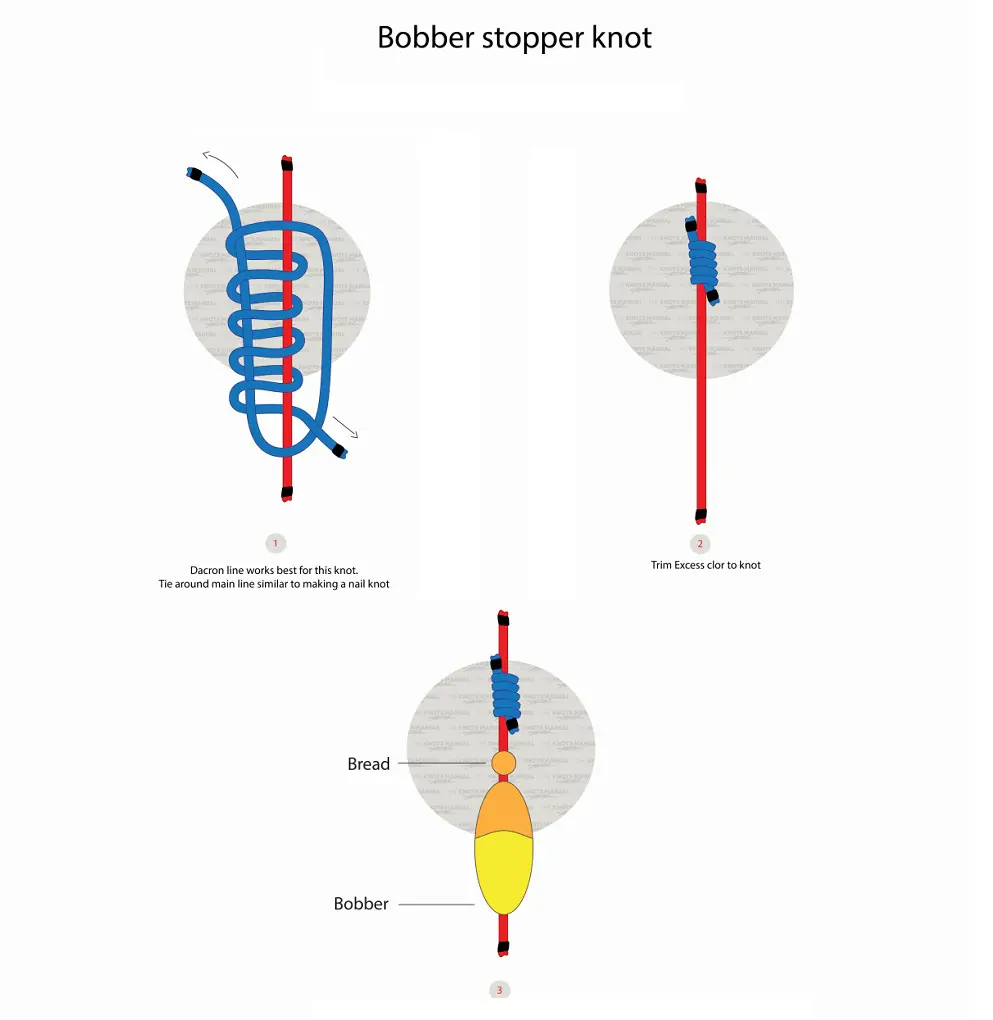
This is the knot to use if you intend to use slip bobbers. Depending on the depth of your fishing, you can modify the Stopper Knot, which should be knotted immediately above the bobber.
Step 1: Estimate a line length of around half a foot.
Step 2: Then to knot the stopper parallel to the line. Double back on the line to form a loop.
Step 3: Pass the line through the open loop three or four times as you wrap it around both lines.
Step 4: To tighten it, pull on both ends.
7. The Blood Knot
Despite not being designed to connect hooks or lures, the Blood Knot may effectively join two fishing lines of varying diameters. When fly fishing, it may be quite useful.
Step 1: Place two tag ends a few inches apart, then wrap one around the other at least five times.
Step 2: Next, wrap the other line on the original five more times. Insert the loose ends through the central hole.
Step 3: Tightly pull on both ends to get the coils as close together as possible.
8. The Surgeon’s Knot
The Surgeon's Knot joins two fishing lines in a similar manner to the Blood Knot (the lines should be the same thickness for this one too).
Step 1: Place each line on top of the others, overlapping them by a few inches.
Step 2: Make a loop by tying a basic overhand knot.
Step 3: Repeatedly pass the leaders and tag ends through the loop.
Step 4: Tighten all four pieces together by pulling.
9. The Double Uni Knot
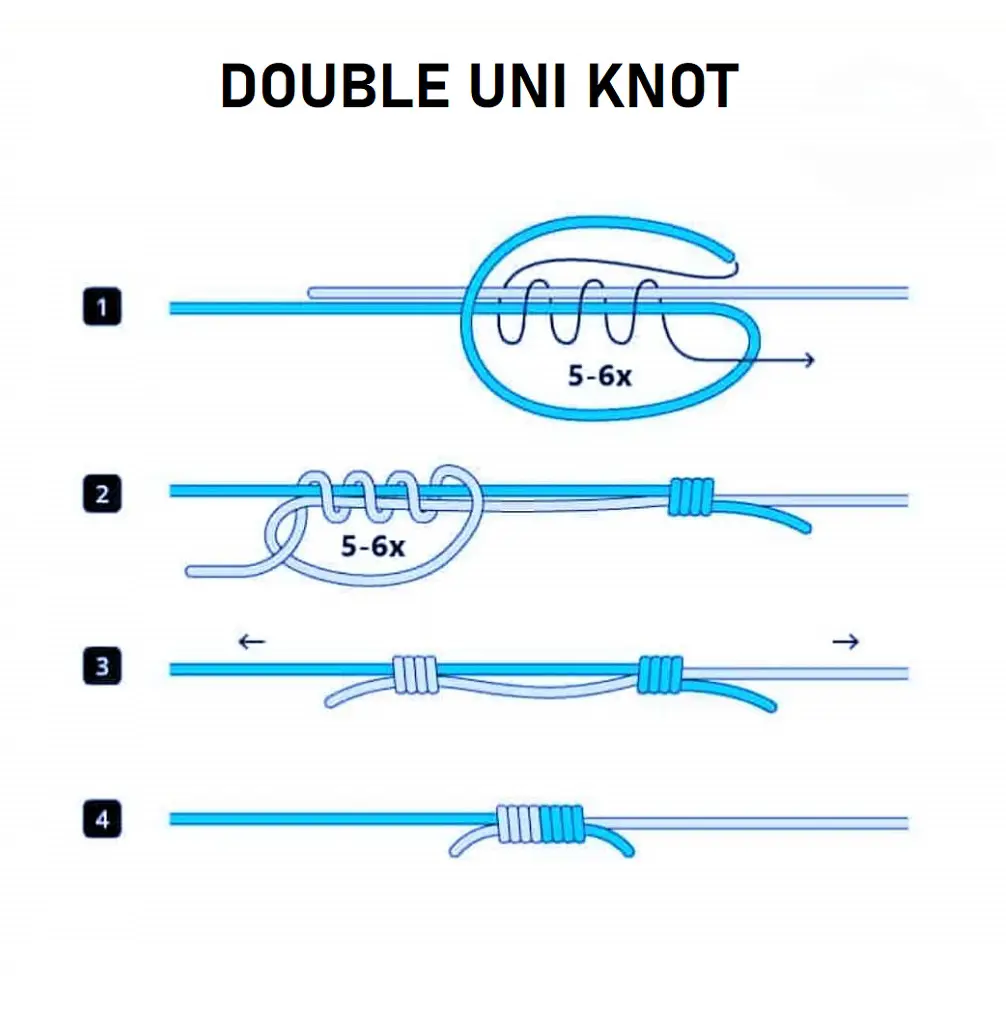
Another technique for safely joining two lines is the Double Uni Knot, which is an improved version of the Hangman or Uni Knot.
Step 1: Make a loop over the double line on either side to overlap the ends of the two lines.
Step 2: Pass both tag ends inside the loop each time you wrap them around the lines on each side three or four times.
Step 3: Two uni knots should now be tied.
Step 4: To tie the two knots together, gradually tighten the standing lines.
10. The Double Surgeon’s Loop
Last but not least is the knot known as the Double Surgeon's Loop. You may be assured that you will have a sturdy loop at the end of your leader when you use this fishing knot.
Step 1: To produce the desired size loop, fold over the end of your line.
Step 2: Make a single overhand knot, leaving it open so you may loop the loop through it again.
Step 3: Hold the line and the loop in step three. Tighten the knot by pulling them.
Parts of a Fishing Hook
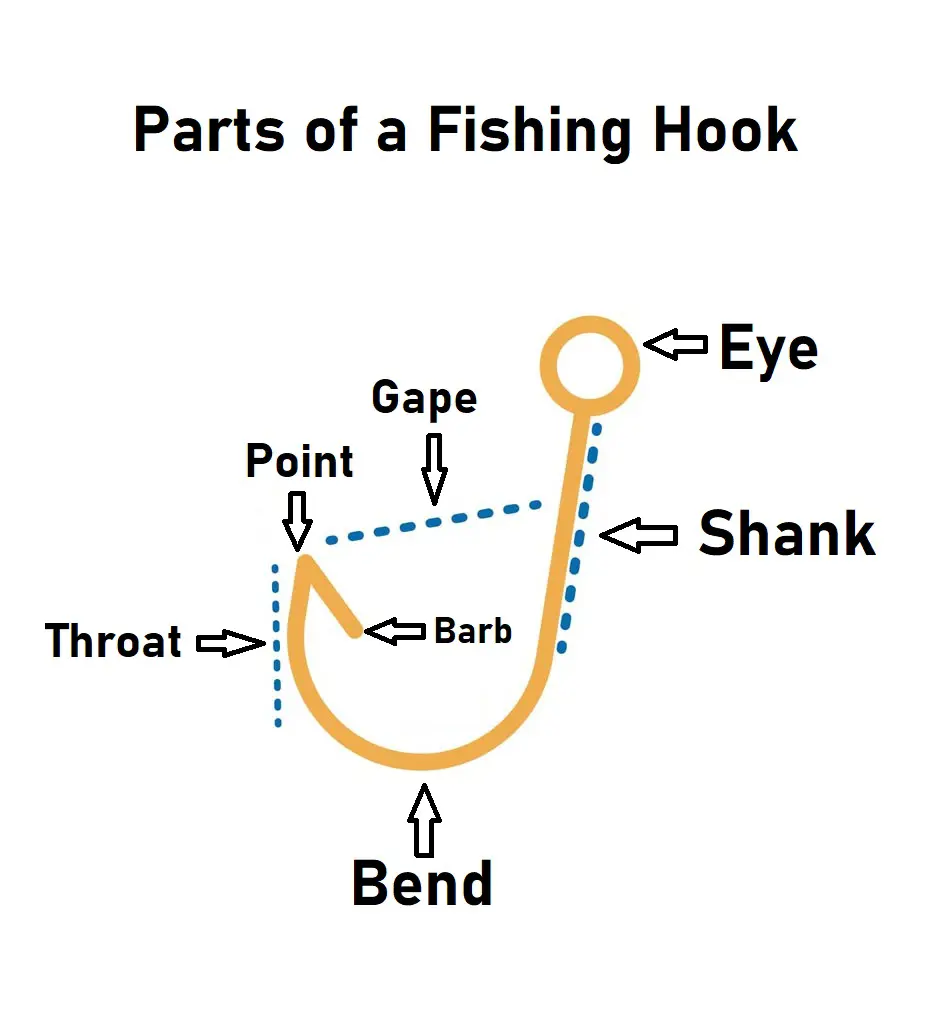
Each component of a fishing hook has a name, and being aware of each portion helps individuals to know what makes a hook unique and what it is used for.
- Point: The point is the jagged piece that enters the fish's mouth.
- Barb: A barb that faces rearward and prevents the hook from slipping.
- Throat: The portion of the hook that descends from the tip is called the throat.
- Bend: The hook's return curve to itself.
- Shank: On the blunt end, identical to the neck.
- Eye: The ring that fastens the hook to a line or bait is called the eye.
- Gape: The gap between the shank and the neck.
Every hook is designed with a specific function. For instance, when working with thin baits like worms, it helps to have a long, narrow shank. However, a broad gape allows you to lure huge predators with larger baits. The tip and the eye have the most distinct variants of all these components.
Types of Hook Point
Over time, the different hook points were evolved. The following are the top five points.
Needle point: The needle tip taper somewhat in the direction of the shank. They are made to be readily punctured and to inflict little harm when they are finished. This minimizes damage to the fish and makes it more difficult for it to throw the hook by keeping the hole tiny.
Spear point: The most popular and excellent all-around point is the spear point. Spear point are oriented directly upward from the neck, allowing for good penetration and little harm to the fish. Compared to more complex types, they are also simpler to sharpen.
Rolled in point: With very little pressure, rolled-in points pierce deeply. The tip points in the direction of the hook eye, aligning your force precisely with the way it passes through a fish's mouth. When carried to the boat, they are ideal for fish that thrash about.
Hollow point: The bent-in spike of a hollow point hook bends down to the barb. Once inside, they remain there and sever soft-mouthed fish. On harder species, though, they might make placing the hook far more challenging.
Knife edge point: They are designed for maximum penetration and are pointed away from the shank and sharpened on both sides. The issue with knife edge points is that they seriously harm fish.
Common Types of Fish Hooks
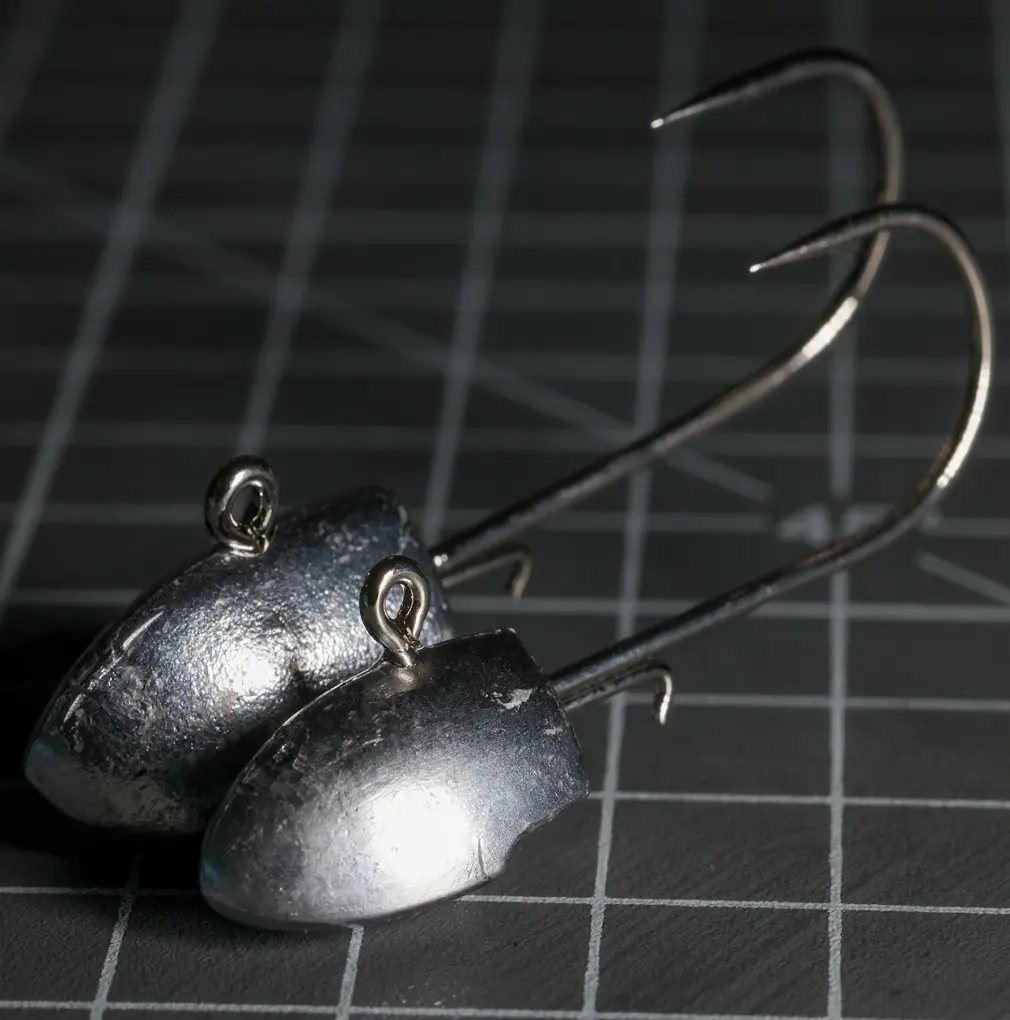
There are dozens or perhaps hundreds of different types of fishing hooks, as anybody who has ever visited a tackle store can attest. Every design has a purpose, and occasionally even the most strange ones are useful. Nonetheless, every respectable fisherman should stock their tackle box with a few different kinds of fishing hooks.
Bait Holder Hooks
Bait holds function precisely what you'd expect: they keep your bait from slipping off the hook. They feature a barbed tip to hook onto any fish that bites it, and barbs on the shank to keep the bait in place. Although bait holders work incredibly well, their barbs may do a lot of harm in the process.
Jig Hooks
These hooks are as simple as they are useful. The eye is positioned at a right angle to the shank to maximize the lure's movement in the water. Jig hooks may be readily modified for catch and release by cutting off or filing the barb on the point.
Worm Hooks
If you enjoy fishing with plastic worms, you and worm hooks are probably longtime friends. The bend around the eye maintains the worm's "head" in place. The tip penetrates the body, ready to grasp upon unwary fish. The remainder of the lure hangs loosely.
Circle Hooks
They are as near to "fish-friendly" tackle as you can get. To prevent them from "deep hooking" a fish's throat or intestines, the tip bends in toward the shank. They catch in the corner of its mouth instead. To avoid ripping them out of their mouth, you must wait until they are securely in place before applying pressure.
Weedless Hooks
Bass fishermen all around the globe love weedless hooks. They are utilized while fishing in lakes and ponds with dense vegetation. They clip onto the point with a tiny guard. By doing this, you avoid removing half of the pond each time you retrieve. In addition, it is sufficiently loosely attached to fall off as soon as the fish eats your bait.
Siwash Hooks
Since siwash hooks are simpler to remove and less damaging to fish, many fishermen replace treble hooks on spinnerbaits or poppers. They have an open eye for simple attachment as a result. Because of their long shanks and tips, siwashes cling to your lure naturally and remain there after setting.
Octopus Hooks
The creator of octopus hooks must only had one goal in mind: showcasing tiny baits in an organic way. They are smaller and lighter because to their short, rounded shank, which also allows them to hook bigger fish. On octopus hooks, the point bends in little, but not as much as on circle hooks.


